
NFS(Network File System)は、複数のホストから、同じファイルを共有することができる、分散ファイルシステムです。NFS の歴史は古く、30年近く使われているそうです。ファイル共有のプロトコルは、FTP や SMB をよく耳にしますが、NFS は、その仕組みのシンプルさから、ロードバランサー配下のWEBサーバなどでよく使われています。
サーバ構成
以下のサーバ構成で NFSサーバを設定し、NFSクライアントでOS起動時に NFSを自動マウントするように設定しました。
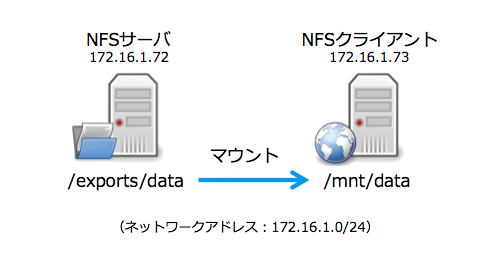
NFSサーバ、NFSクライアント共に、サーバOSは CentOS 7.1 (1503) です。CentOS6系と、少し NFS の設定方法が変わっています。
NFS サーバの設定
・NFS のパッケージをインストール
yum -y install nfs-utils
・NFS で共有するディレクトリを作成
mkdir -p /exports/data
・共有ディレクトリのオーナーを「nfsnobody」に変更
chown nfsnobody:nfsnobody /exports/data
・共有ディレクトリの設定
vim /etc/exports
/exports/data 172.16.1.73(rw,all_squash)
書式は「<共有ディレクトリのパス> <接続を許可するIPアドレス>(<オプション>)」です。
<接続を許可するIPアドレス>は「172.16.1.0/24」など、ネットワークアドレスでも設定可能です。
<オプション>は「rw」で読み書きを許可「all_squash」ですべてのアクセスを nfsnobodyユーザ として処理するように設定しています。
「all_squash」を設定することで、NFSサーバのマウント先では、全てのユーザが共有ディレクトリに、読み書き可能になります。この設定により、例えばですが webmaster ユーザが作成したディレクトリに、httpdプロセスオーナーの apacheユーザが書き込めないといったことを防ぎます。
・IPv6を無効にしている場合は、以下も変更しておきます。
vim /etc/netconfig
udp6       tpi_clts      v     inet6    udp     -       -
tcp6       tpi_cots_ord  v     inet6    tcp     -       -
 ↓
#udp6       tpi_clts      v     inet6    udp     -       -
#tcp6       tpi_cots_ord  v     inet6    tcp     -       -
・起動
systemctl start nfs-server
・自動起動設定
systemctl enable nfs-server
CentOS 7.1 で変わったこと
CentOS6系では「rpcbind」や「nfs-lock」などを、合わせて起動する必要がありましたが、CentOS7.1 では、これらが static サービスになったため、起動や自動起動を、設定する必要が無くなったようです。
systemctl list-unit-files | grep -e rpcbind -e nfs-lock -e nfs-idmapd
nfs-idmapd.service                          static
nfs-lock.service                            static
rpcbind.service                             static
rpcbind.socket                              enabled
rpcbind.target                              static
起動確認
rpcinfo -p (以下のような表示であればOK)
   program vers proto   port  service
    100000    4   tcp    111  portmapper
    100000    3   tcp    111  portmapper
    100000    2   tcp    111  portmapper
    100000    4   udp    111  portmapper
    100000    3   udp    111  portmapper
    100000    2   udp    111  portmapper
    100005    1   udp  20048  mountd
    100005    1   tcp  20048  mountd
    100005    2   udp  20048  mountd
    100005    2   tcp  20048  mountd
    100005    3   udp  20048  mountd
    100024    1   udp  53923  status
    100024    1   tcp  58773  status
    100005    3   tcp  20048  mountd
    100003    3   tcp   2049  nfs
    100003    4   tcp   2049  nfs
    100227    3   tcp   2049  nfs_acl
    100003    3   udp   2049  nfs
    100003    4   udp   2049  nfs
    100227    3   udp   2049  nfs_acl
    100021    1   udp  58364  nlockmgr
    100021    3   udp  58364  nlockmgr
    100021    4   udp  58364  nlockmgr
    100021    1   tcp  48875  nlockmgr
    100021    3   tcp  48875  nlockmgr
    100021    4   tcp  48875  nlockmgr
・共有ディレクトリ設定の確認
exportfs -v
/exports/data 172.16.1.73(rw,wdelay,root_squash,all_squash,no_subtree_check,sec=sys,rw,secure,root_squash,all_squash)
(参考資料)8.7. NFS サーバーの設定 | Red Hat Enterprise Linux 7
firewalld の設定
・ポート 111 と ポート 2049 の TCP/UDP を許可します
firewall-cmd --add-port=2049/tcp --permanent
firewall-cmd --add-port=2049/udp --permanent
firewall-cmd --add-port=111/tcp --permanent
firewall-cmd --add-port=111/udp --permanent
・設定を読込みます
firewall-cmd --reload
・設定を確認します(以下の表示があればOKです)
firewall-cmd --list-all
ports: 111/udp 2049/tcp 2049/udp 111/tcp
NFS クライアントの設定
・NFS のパッケージをインストール
yum -y install nfs-utils
・マウントポイントの作成
mkdir /mnt/data
・マウント設定
vim /etc/fstab
---(以下を最終行に追加)-------
172.16.1.72:/exports/data /mnt/data nfs defaults 0 0
OS起動時に、上記の設定で自動マウントされます。
・マウント
mount /mnt/data
・マウント確認(以下のような表示があればOKです)
nfsstat -m
/mnt/data from 172.16.1.72:/exports/data
 Flags:	rw,relatime,vers=4.0,rsize=131072,wsize=131072,namlen=255,hard,proto=tcp,port=0,timeo=600,retrans=2,sec=sys,clientaddr=172.16.1.73,local_lock=none,addr=172.16.1.72
(参考資料) 8.3. NFS クライアントの設定 | Red Hat Enterprise Linux 7
NFS マウントのタイムアウト値
NFSサーバがダウンしている場合、NFSクライアントサーバのOS起動に時間がかかります。これは、NFS自動マウント(/etc/fstab)の設定をしているため、NFS マウントのタイムアウトを待ってから、OSが起動するためです。
タイムアウト値の設定は、マウントオプション「timeo」と「retrans」の組み合わせで指定します。デフォルトの設定でのタイムアウト値は、およそ180秒になっています。
・タイムアウト値の確認
/mnt/data from 172.16.1.72:/exports/data
Flags:  (略)timeo=600,retrans=2(略)
※NFS(5) の man ページより引用
timeo=n The time in deciseconds (tenths of a second) the NFS client waits for a response before it retries
an NFS request.For NFS over TCP the default timeo value is 600 (60 seconds). The NFS client performs linear back‐
off: After each retransmission the timeout is increased by timeo up to the maximum of 600 seconds.However, for NFS over UDP, the client uses an adaptive algorithm to estimate an appropriate timeout
value for frequently used request types (such as READ and WRITE requests), but uses the timeo set‐
ting for infrequently used request types (such as FSINFO requests). If the timeo option is not
specified, infrequently used request types are retried after 1.1 seconds. After each retransmis‐
sion, the NFS client doubles the timeout for that request, up to a maximum timeout length of 60
seconds.retrans=n The number of times the NFS client retries a request before it attempts further recovery action. If
the retrans option is not specified, the NFS client tries each request three times.The NFS client generates a "server not responding" message after retrans retries, then attempts
further recovery (depending on whether the hard mount option is in effect).
少しややこしいですが、timeo は 600 × 0.1 = 60秒になります。retrans(リトライ回数)は、2回なので、、、
マウント実行
↓(60秒)
リトライ1回目
↓(60秒)
リトライ2回目
↓(60秒)
NFSマウント失敗
合計 180秒 となる計算です。※英語力が乏しいので(^^;) もし解釈が間違っていたら教えてください。
終わりに
今さらではありますが、NFS は簡単に設定ができて、普通のストレージと同じように使えるのが、とても便利ですね。


コメント